


Flushing a Tanked Water Heater
A Comprehensive DIY Guide for Homeowners
By NCWaterHeaters.com LLC
In this article you will be presented with a practical and effective way to flush your electric or gas tanked hot water heater. Please note that the following procedure does not apply to tankless water heaters. This guide is a general “how to” and may not apply to all circumstances or water heaters. If at any point you do not feel comfortable or notice something has gone wrong you should shut off the water to the home and immediately contact your preferred licensed plumber. NCWaterHeaters.com LLC takes no responsibility for the use or misuse of this guide.
Tools Needed:
- Garden Hose
- Screw Driver
- Volt Meter (for electric models)
Step One: First, before any work is done, you will need to shut off the source of fuel (Gas) or power (electric) to your hot water heater. Please see the noted subsections below for gas and electric water heaters.
- Gas Water Heater: On the front of the gas control valve you will see the thermostat, which controls the temperature setting of the water heater. Simply turn the thermostat to the “Vacation” or lowest setting possible. This allows the pilot to stay lit during the process of flushing the water heater without letting the burner to ignite.

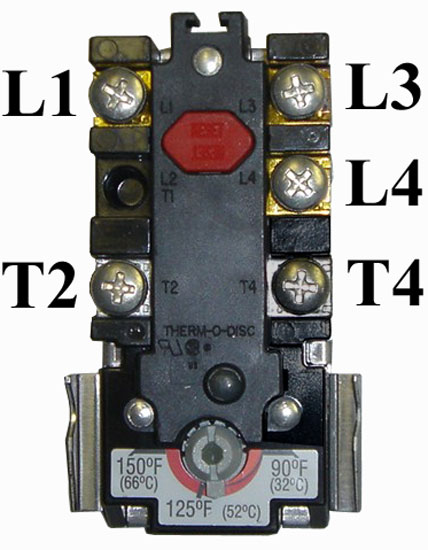
- Electric Water Heater: On electric models you will need to find the breaker for your water heater in the breaker panel box and turn it off. For safety I highly recommend that you test the water heater for current with a volt meter to verify the power to the unit has been turned off. Remove the top panel facing you from the water heater and put the test leads on L1 and L3 as seen in the picture below. If the power is on you will see 240 volts on your meter. If the power has been successfully turned off there will no reading on the meter.
Step Two: Next, hook up your garden hose to the water heater drain which is located on the bottom of the tank. This valve/drain may be either made of brass or plastic depending on the manufacture of you particular water heater. Take the other end of your garden hose and place it somewhere that is safe for the contents of the water heater to drain to. The hose must be lower than the water heater in order for gravity to allow the water to drain. Be sure there are no kinks in the hose.

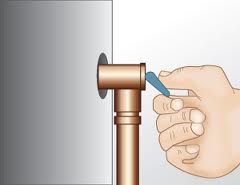
Step 3: Open the drain valve at the water hose connection and allow the water to run through your hose full force. This gives sediment and other debris more of an opportunity to be pushed through the valve. If there is no water draining from the tank you can sometimes move the drain valve open and shut to get the water flowing. In some circumstances the water heater may not drain due to excessive amounts of debris and deposits clogging the passage through the valve. If your water will not drain contact your preferred licensed plumber for assistance. The valve may have a handle or a slot for a screwdriver.
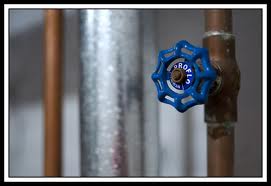
Step 4: With the drain in the full open position turn off the water to the water heater. The shut off valve for the water heater will typically be within the first couple on the cold water supply coming into the heater. If you have an older type “gate” valve be warned that these can often malfunction and become stuck in the open, closed, or in between positions. It generally helps if the valve is closed slowly and frequently turned back to the open position by turning 1 clockwise and ½ turn counter clockwise. Repeat these steps until the valve stops in the fully closed position.
Step 5: After the water has been shut off to the heater you will need to open the temperature and pressure release valve, commonly called the “T&P”. This valve is located either on the top or side of the water heater on most brands. The lever of the valve should be moved to the open position and can typically be held in place on its own by moving it to a perpendicular position in reference to the water heater. This will allow air to displace the water leaving the tank and decrease the time needed to drain the tank.
Step 6: Waiting…….at this point it’s a waiting game. Depending on the size, age, amount of debris, and other variables it may take anywhere from 20 minutes to over an hour to drain the contents of the tank.
Step 7: Once the water heater has finished draining you will need to “splash the tank”. This process is performed by turning the water back on for 30 seconds then back off until the tank has drained again. This process can be repeated as many times as needed to remove the remaining deposits in the bottom of the tank. Typically you will never fully clear out the bottom of the tank but you should see improvements and better water clarity as you splash the tank.
Step 8: Next, shut the drain valve to the off position and remove your garden hose.
Step 9: Shut the T&P valve to the off position
Step 10: Turn the water back on and begin filling the tank. While the tank is filling up you will need to open one or multiple fixtures throughout the home on the hot side. The closest tub/shower is the ideal so that any remaining debris in the water lines are able to pass through it. There will be a large amount of air and often discolored water that comes out of the fixture as the tank fills. This is normal and should clear out once all of the air is purged from the plumbing system and has been allowed to flow through the fixtures for several minutes.
Step 11: Now that you have flushed and filled the tank, allowed all of the air to purge through the plumbing system, and have made sure that there are no leaks or other concerns it is time to restore power or fuel to the water heater. On electric models you will need to turn the breaker back on. On gas units simply turn the thermostat back from “vacation” to the factory pre-marked setting of 120 degrees. *water heaters should never be set above 120 degrees Fahrenheit for standard residential applications. Severe burns, death, and other dangerous conditions can result in operating the water heater above factory intended purposes. If your water heater is on a side loop system connected to your HVAC or if a commercial application such as the use of a commercial dishwasher is present, consult a licensed professional before turning the temperature above 120 degrees Fahrenheit.
NCWaterHeaters.com LLC offers this guide free of charge for residential use, at the homeowner’s discretion and takes no responsibilities for damages or injuries that may occur. Never attempt a repair or service you are not comfortable with.